7 Zapier Automations Every Small Business Owner Needs (And How to Build Them)
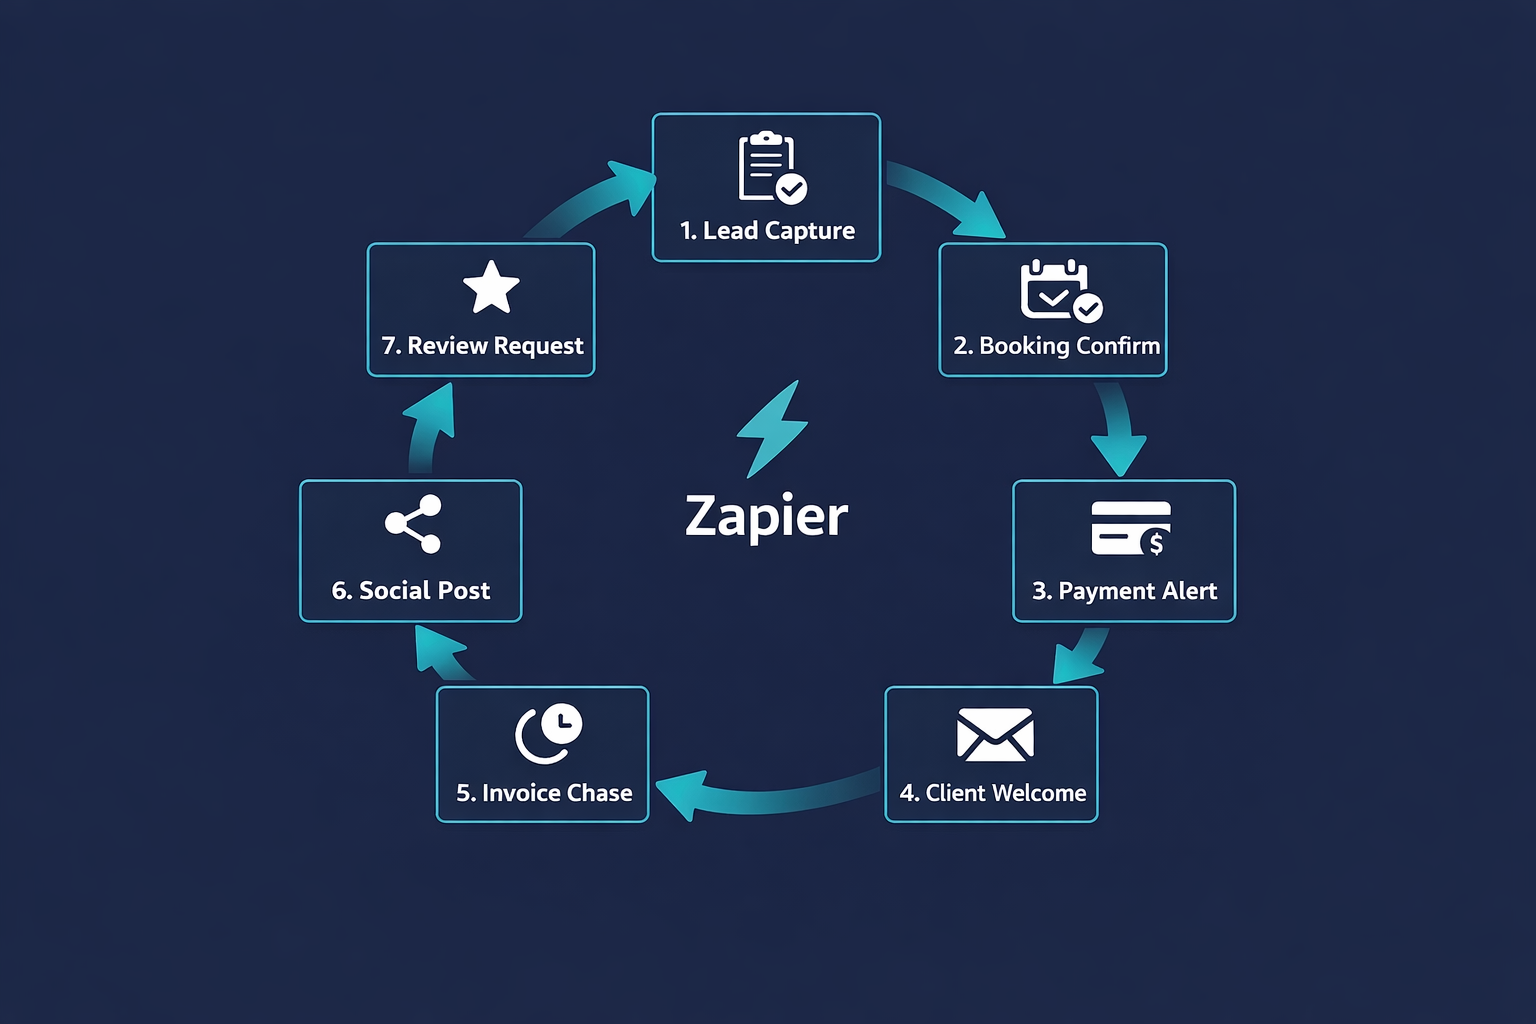
The 7 Zapier automations every small business needs are: lead capture to CRM, booking confirmation with prep tasks, payment received alert, new client welcome email, overdue invoice chase, social media auto-posting, and review request after project close. All 7 run on Zapier Professional at $19.99/mo. Combined setup time is under one working day.
Time to build
1 day
Weekly savings
6 hours/week
Setup cost
$19.99/mo
Read time
12 min read
The Blueprint Summary
Build these 7 Zapier workflows once and recover 6 hours every week: lead capture to CRM, booking confirmation with prep task, payment alert to Slack, new client welcome sequence, overdue invoice chase, social auto-post, and post-project review request.
Build all 7 once and get back 6 hours every week, permanently.
Key Takeaways
- ✓ All 7 automations run on a single Zapier Professional account at $19.99/mo billed annually
- ✓ Each automation takes 20 to 45 minutes to build, the full set takes under one working day
- ✓ Automation 2 requires Calendly Standard at $10/mo, the free plan does not support Zapier
- ✓ Build and test each automation one at a time, never build all 7 before testing the first
- ✓ The review request in automation 7 alone can double your inbound referrals if sent consistently
Before You Start
- → A Zapier Professional account at $19.99/mo billed annually, required for all multi-step Zaps
- → A HubSpot Free account for automation 1, no credit card required
- → A Calendly Standard account at $10/mo billed annually for automation 2, the free plan blocks Zapier
- → A Slack workspace (free plan works) or a dedicated Gmail address for internal alerts
- → Access to whatever tools you already use for invoicing, bookings, and social media posting
Email this guide to yourself
Get the link in your inbox so you can implement it when you have time.
Check your inbox — the link is on its way.
No spam. Unsubscribe anytime.
Why these 7 automations and not 50 others
There are thousands of Zapier automations a small business could build.
These 7 were chosen because they address the tasks that every service business, solo operator, and small team does manually every single week without exception.
They cover the full revenue cycle: leads coming in, bookings getting confirmed, payments being tracked, clients getting welcomed, overdue invoices getting chased, content getting distributed, and clients being asked for reviews.
None of them require code.
None of them require a paid CRM.
All 7 run on a single Zapier Professional account at $19.99/mo billed annually.
What these 7 automations actually replace
Automation 1 replaces copying lead details from your inbox into a CRM by hand.
Automation 2 replaces writing a personal confirmation email every time someone books a meeting with you.
Automation 3 replaces checking your bank or payment dashboard to see if a payment has cleared.
Automation 4 replaces sending a welcome email every time a new client pays or signs.
Automation 5 replaces remembering to follow up on overdue invoices, which most business owners do inconsistently or not at all.
Automation 6 replaces manually posting your new blog content to every social channel after publishing.
Automation 7 replaces meaning to ask clients for a review and forgetting, which is the most expensive mistake in this entire list.
The time cost of doing these manually
At 3 minutes each, automations 1 through 4 running 20 times per week costs 60 minutes of manual work per week.
Over a year that is 52 hours gone to tasks you could eliminate in a single day.
Automation 5 is not about time, it is about consistency: most businesses chase overdue invoices late or irregularly, and the average overdue invoice sits unpaid for 30 days longer than it needs to.
A single missed payment chase on a $1,000 invoice costs more in cash flow delay than the entire annual Zapier subscription.
Automation 6 saves roughly 15 minutes per blog post published.
Automation 7 is the most asymmetric return of all seven: a Google review request takes 2 minutes to send, but every 5-star review you earn compounds for years in local search rankings and referral trust.
In total, these 7 automations recover 5 to 7 hours of manual work every week once your business reaches a moderate activity level.
At $30/hr that is between $7,800 and $10,920 per year in recovered productive time, from a $240/yr subscription.
Why Zapier and not Make or n8n
This guide uses Zapier because its setup time is the shortest of any automation platform for non-technical users.
Each of the 7 automations in this guide takes between 20 and 45 minutes to build in Zapier.
The same workflows take 60 to 120 minutes each in Make and require technical server setup in n8n.
If you already use Make or n8n, every automation in this guide translates directly to your platform.
The trigger and action logic is identical across all three tools.
Only the interface differs.
The one rule that prevents most failures
Build one Zap at a time, test it with a real event (not Zapier sample data), confirm the output is correct, then move to the next.
Do not build all 7 before testing any of them.
A batch of 7 untested Zaps running simultaneously is nearly impossible to debug when something goes wrong.
And something always goes wrong on the first build.
Every automation in this guide includes a specific test action as the final sub-step.
Skipping it means the first real lead, payment, or project close becomes your test, and that is the worst time to discover a broken field mapping.

How to prioritise which Zap to build first
If you are losing leads to slow follow-up, build automation 1 first.
If you have outstanding unpaid invoices right now, build automation 5 first.
If you are signing new clients and onboarding them by hand, build automation 4 first.
The review request in automation 7 has the highest compounding return of all seven, so always build it within the first week regardless of which one you start with.
The remaining automations can be built in any order once the highest-priority one is live and tested.
When NOT to build all 7
Do not build all 7 if you are generating fewer than 5 leads or handling fewer than 5 client interactions per week.
At very low volume, the combined Zapier task usage stays well within the free plan and the time cost of building 7 Zaps outweighs the time saved for the first few months.
Start with automation 1 and automation 5 only.
Both have an immediate return at any volume.
Add the remaining 5 as your activity level grows and the manual work becomes the bottleneck.
What good looks like when all 7 are running
Every new lead is in HubSpot within 60 seconds of form submission with a sales alert in your inbox.
Every new booking triggers a confirmation email and a Notion prep page without you doing anything.
Every cleared payment posts a notification to Slack and logs a row in your revenue sheet automatically.
Every new client receives a professional welcome sequence from Mailchimp the moment they pay.
Every overdue invoice triggers a polite chase email without you having to remember it exists.
Every published blog post queues automatically in Buffer for your social channels.
Every completed project triggers a review request 3 days later, consistently, every single time.
Your Zapier task history shows all 7 Zaps running green every day.
You are doing none of it by hand.
Implementation Steps
Automation 1: Lead form to CRM
Connect any contact form or Facebook Lead Ad to HubSpot so every new lead is logged, tagged, and alerts your inbox in under 60 seconds.
- • Open Zapier, click Create Zap, and select your form tool (Typeform, Google Forms, Facebook Lead Ads, or Jotform) as the trigger
- • Add a HubSpot Find Contact action, map the email field, and enable Create if not found
- • Add a HubSpot Update Contact action and map name, phone, and a custom Capture Source property to the form name
- • Add a Gmail Send Email or Slack Send Message action with the lead details mapped in the body
- • Submit a real test entry through your live form and confirm all steps show green in Zapier task history
- • Turn the Zap on
HubSpot Free. Zapier Professional at $19.99/mo billed annually required for multi-step Zaps.
The Catch
Facebook Lead Ads needs a live campaign with at least one real submission to generate usable test data. Use Typeform first if your campaign is not yet active and swap the trigger later.
Automation 2: New booking to confirmation email and prep task
When someone books a meeting in Calendly, send a personalised confirmation email and create a prep task in Notion so you arrive to every call ready.
- • Create a Zap with Calendly as the trigger and select Invitee Created as the event
- • Connect your Calendly Standard account (the free plan does not support this trigger)
- • Add a Gmail Send Email action, map the invitee email and name, and write a one-sentence prep message with the meeting link
- • Add a Notion Create Page action, connect your workspace, and map the invitee name and meeting date as the page title
- • Add any fields you want pre-filled on the Notion page, such as meeting type or prep notes
- • Book a test meeting through your own Calendly link and confirm both the email and Notion page fire correctly
Calendly Standard at $10/mo billed annually is required. The free plan does not support Zapier triggers. Notion Free and Gmail Free. Zapier Professional at $19.99/mo.
The Catch
Calendly Zapier triggers require Calendly Standard or higher. This is clearly stated in Calendly help documentation but catches almost every first-time builder. Check your plan before spending 30 minutes building the Zap.
Automation 3: Payment received to Slack alert and Google Sheets log
The moment a payment clears in Stripe, post a win notification to your Slack and log the transaction in a Google Sheet so your revenue tracking never has a gap.
- • Create a Zap with Stripe as the trigger and select Payment Intent Succeeded as the event
- • Connect your Stripe account and load a test payment as sample data
- • Add a Slack Send Message action, set the channel to a wins channel or your main channel, and map amount, customer name, and product
- • Add a Google Sheets Create Spreadsheet Row action and connect your revenue tracking sheet
- • Map Date, Customer Name, Amount, Currency, and Product Description to the correct columns
- • Run a real test payment via Stripe test mode and confirm both the Slack message and the Sheet row appear
Stripe has no monthly fee, it charges per transaction (1.5% plus card fees outside the US, 2.9% plus $0.30 in the US). Google Sheets Free. Slack Free plan works for outgoing messages.
The Catch
Stripe test mode and live mode use separate API keys. Build and test the Zap in test mode, then swap the Stripe connection to your live account before turning it on. Forgetting this step means live payments produce no alerts until you manually fix the connection.
Ready to get started with Zapier?
Connect 8,000+ apps and kill manual data entry forever.
Try Zapier Free →Automation 4: New paid client to welcome email sequence
When a new client pays or signs a contract, add them to a Mailchimp welcome sequence so they receive a professional onboarding series without you sending a single email by hand.
- • Create a Zap triggered by your payment tool (Stripe Checkout completed) or contract tool (new signed document)
- • Add a Mailchimp Add or Update Subscriber action and connect your account
- • Set Audience to your client onboarding list
- • Map Email Address and First Name from the trigger data
- • Assign the onboarding tag that triggers your pre-built welcome sequence in Mailchimp
- • Complete a test purchase or sign a test document with your own email and confirm the Mailchimp subscriber appears with the correct tag
Mailchimp Free plan supports up to 500 contacts and basic automations. The welcome sequence must be built inside Mailchimp before this Zap step will do anything. Zapier Professional at $19.99/mo.
The Catch
Zapier can only assign a subscriber to a sequence that already exists in Mailchimp. Build and test the email sequence in Mailchimp first using a dummy subscriber, then build this Zap. If the sequence does not exist when the Zap fires, the subscriber is added but receives nothing.
Automation 5: Overdue invoice to polite payment chase email
When FreshBooks marks an invoice as overdue, send a pre-written chase email from Gmail automatically so no outstanding payment gets forgotten.
- • Create a Zap with FreshBooks as the trigger and select Invoice Overdue as the event
- • Connect your FreshBooks account and load an existing overdue invoice as sample data
- • Add a Gmail Send Email action
- • Map the To field to the client email from FreshBooks, the invoice number to the subject line, and the outstanding amount to the email body
- • Write the body as a single short paragraph: state the invoice number, the amount, the due date, and the payment link
- • Mark a test invoice as overdue in FreshBooks and confirm the Gmail message arrives within 2 minutes
FreshBooks Lite plan starts at $17/mo billed annually and is required for the Invoice Overdue Zapier trigger. Gmail is free. Zapier Professional at $19.99/mo.
The Catch
The FreshBooks Invoice Overdue trigger fires once when the status changes to overdue. It does not repeat daily. If you want recurring reminders, add a second Zap with a Delay by Zapier step and a second Gmail action set to fire 7 days after the first.
Automation 6: New blog post to social media auto-post via Buffer
When a new post appears on your blog RSS feed, send it to Buffer so it is automatically queued for publication on your connected social channels without you touching it.
- • Create a Zap with RSS by Zapier as the trigger and enter your blog RSS feed URL
- • Set the trigger event to New Item in Feed
- • Add a Buffer Create Update action and connect your Buffer account
- • Set Profile to the social channel you want to post to (Facebook Page, LinkedIn, or Instagram)
- • Map the post title and URL to the Buffer text field in this format: [Title] - Read more: [URL]
- • Publish a test blog post and confirm the Buffer queue shows the new entry within 5 minutes
Buffer Free plan supports 3 social channels and up to 10 queued posts per channel. Buffer Essentials at $6/mo per channel removes the queue cap. Zapier Professional at $19.99/mo.
The Catch
Buffer queues posts according to your posting schedule, not immediately. If your Buffer schedule has no slot for the next 3 days, the post sits in the queue for 3 days. Set your Buffer schedule before testing this Zap or the test will appear to have failed when it has not.
Automation 7: Project closed to review request email after a 3-day delay
When a project is marked as complete in Notion, wait 3 days then send a short email asking the client for a Google review while the experience is still fresh.
- • Create a Zap with Notion as the trigger and select Updated Database Item as the event
- • Add a Filter step: only continue if the Status property equals Done or Complete
- • Add a Delay by Zapier action and set the delay to 3 days
- • Add a Gmail Send Email action
- • Map the To field to the client email property in your Notion database
- • Write the body as 2 sentences: thank them for working with you and include your direct Google review link
Notion Free plan supports full database functionality and Zapier integration. Gmail is free. Zapier Professional at $19.99/mo. The Delay step does not count toward your task usage.
The Catch
The Notion Updated Database Item trigger fires on every property change, not just Status. Without the Filter step in step 2, your Zap fires every time anyone edits anything in that database and your clients receive review requests at random. Add the Filter before testing.
Tools That Can Run This
This guide uses Zapier. Here is how alternatives compare.
| Tool | Plan Needed | Monthly Cost | Best For | The Catch |
|---|---|---|---|---|
| Zapier | Professional | $19.99 | Non-technical users who need fast setup across 8,000 apps with zero code | 750 tasks/mo billed annually. Each action step per run counts as one task. If all 7 Zaps run frequently, monitor your task usage in the first week. |
| Make | Core | $9 | Higher task volumes or complex multi-branch logic at a lower cost per operation | Steeper learning curve. Each automation in this guide takes 2 to 3 times longer to build in Make than in Zapier. |
| n8n | Self-hosted (free) or Cloud Starter at $20/mo | $0 to $20 | Technical users who want unlimited task runs and no per-execution charges | Self-hosted requires a VPS. Not practical for non-technical users building their first automation stack. |
Implementation notes for global businesses
🌍 Africa
All tools in this guide work across Africa. Zapier Professional and Calendly Standard both require an international Visa or Mastercard. Chipper Cash and Geegpay issue free virtual Visa cards that work for both. For automation 3, Stripe is available in South Africa, Kenya, Ghana, Nigeria, Rwanda, Egypt, Morocco, Tanzania, Senegal, Ivory Coast, and Cameroon. If Stripe is not available in your market, use the Paystack or Flutterwave Zapier integrations instead, as both have native Zapier triggers. HubSpot Free, Mailchimp Free, Notion Free, and Buffer Free all require no payment information at all.
🌍 Latin America
Zapier, HubSpot, Mailchimp, Notion, and Buffer all work without restriction across Latin America. Zapier Professional billing requires a Visa or Mastercard. Pix and MercadoPago are not accepted by Zapier or Calendly directly. A Wise or Payoneer virtual card works for both. Stripe is available in Mexico, Brazil, Chile, Colombia, Peru, Uruguay, Paraguay, El Salvador, and Ecuador. For other Latin American markets, use Conekta (Mexico) or PayU (Colombia, Peru, Chile) as Stripe alternatives with Zapier triggers.
🌍 Southeast Asia
All tools in this guide work across Southeast Asia. Zapier Professional and Calendly Standard payment works with any Visa or Mastercard issued by local banks. Stripe is available in Singapore, Malaysia, Thailand, Indonesia, Philippines, and Vietnam. Buffer Free and Mailchimp Free require no payment. For automation 6, Facebook and Instagram are the dominant social channels in the region; Buffer supports both natively on the free plan for up to 3 channels.
Common Mistakes
Building all 7 Zaps before testing any of them
Build one Zap, test it with a real event (not Zapier sample data), confirm the output is correct, then move to the next. A batch of 7 untested Zaps running live simultaneously is nearly impossible to debug when something goes wrong.
Using Zapier sample data as the final test for any Zap
Sample data is auto-generated and does not replicate your actual field values or optional field behaviour. Every Zap in this guide must be tested by triggering a real event: submit an actual form, book a real meeting, run a real Stripe test payment, publish a real blog post.
Skipping the Calendly Standard upgrade and wondering why automation 2 does not trigger
Calendly Free does not support Zapier. The trigger simply will not fire. Upgrade to Calendly Standard at $10/mo billed annually before building the Zap, not after spending an hour debugging a silent failure.
Forgetting to add the Filter step in automation 7
Without the Filter, Notion fires the trigger every time any property on any record in the database is updated. Every minor edit triggers a review request email. Add the Filter (Status equals Done) immediately after the trigger step and before any other action.
Do not want to build all 7 yourself?
The Zapier Automation Recipe Pack includes pre-built versions of automations 1, 2, and 5 from this guide. Import, connect your accounts, and they are live in under 30 minutes.