How to Set Up Make for Free and Automate Your First Scenario in Under an Hour
Make offers a permanently free plan with 1,000 operations per month, 2 active scenarios, and access to all 3,000 plus integrations with no credit card required. Setting up a first scenario takes under an hour. This guide builds a practical starter scenario: new Typeform submission to Google Sheets row and Gmail alert.
Time to build
1 hour
Weekly savings
2 hours/week
Setup cost
$0
Read time
8 min read

The Blueprint Summary
Create a free Make account, build a 3-module scenario that adds a new Typeform or Google Forms submission to a Google Sheet and sends you a Gmail alert, test it with a real submission, and turn it on, all in under an hour with no credit card and no code.
Your first running Make scenario proves the concept and builds the muscle memory to automate everything else in your business.
Key Takeaways
- ✓ Make's free plan includes 1,000 operations per month with no credit card and no expiry date
- ✓ The free plan is limited to 2 active scenarios and a 15-minute minimum polling interval, upgrade to Core at $10.59/mo for unlimited scenarios and 1-minute intervals
- ✓ Every module in a Make scenario counts as one operation per run, a 3-module scenario uses 3 operations each time it fires
- ✓ Always test with a real event submission, not Make's built-in sample data, before going live
- ✓ Scenario names and module labels matter: name them clearly so you can understand them 3 months later without rebuilding from memory
Before You Start
- → A Google account for Google Sheets and Gmail, both free
- → A Typeform free account or Google Forms for the trigger, Typeform Free is recommended because it triggers Make in real time
- → A Google Sheet with column headers matching the form fields you want to capture
- → 10 minutes to read through the full guide before opening Make so you know what each step does before you build it
Email this guide to yourself
Get the link in your inbox so you can implement it when you have time.
Check your inbox — the link is on its way.
No spam. Unsubscribe anytime.
Why Make is worth the learning curve
Make looks more complicated than Zapier on first impression because it shows you the entire workflow as a visual canvas instead of hiding the complexity behind a step-by-step wizard.
The visual canvas is the feature, not the problem.
Once you understand it, you can see exactly what your automation does, how data flows between modules, and where it fails, all from a single screen.
Zapier hides this complexity and makes the first build faster, but makes debugging harder and makes complex workflows impossible without significant workarounds.
What the free plan actually gives you
Make Free includes 1,000 operations per month with no credit card and no expiry.
It includes access to all 3,000 plus integrations, the full visual builder, webhooks, routers, filters, and iterators.
The only real limitations are 2 active scenarios maximum and a 15-minute minimum polling interval for scheduled triggers.
For a first scenario running at low volume, 1,000 operations is sufficient.
A 3-module scenario running 100 times per month uses 300 operations, leaving 700 for a second scenario.
Make Core at $10.59/mo billed annually removes both limits and raises your allowance to 10,000 operations per month.
What you are building in this guide
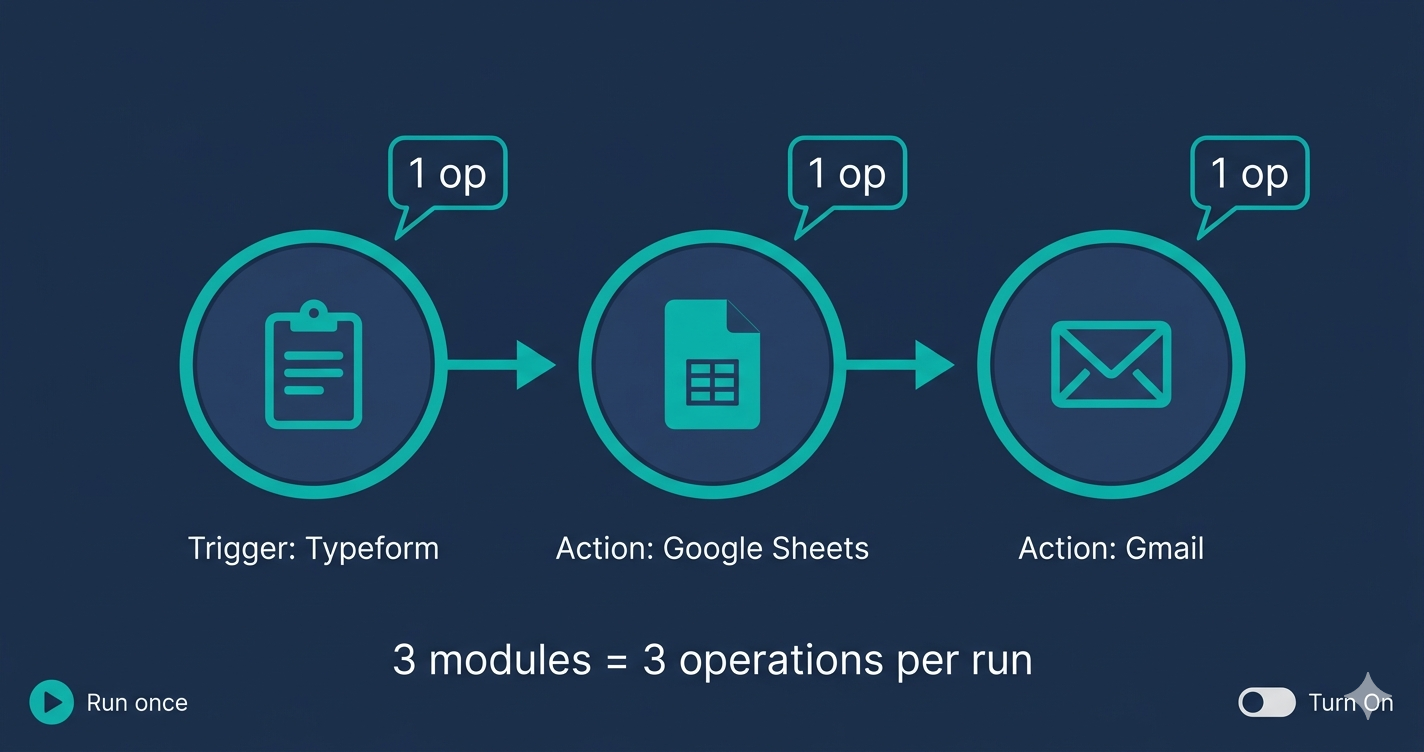
This guide builds a 3-module Make scenario: a Typeform trigger, a Google Sheets Add a Row action, and a Gmail alert.
When someone fills in your Typeform, their submission lands in a Google Sheet row and you receive a Gmail notification with their details, all within the polling interval.
This is the simplest practical scenario you can build and it teaches you everything you need to know about Make's module system before you build anything more complex.
The entire build takes under an hour on the first attempt.
Subsequent scenarios take significantly less time once you understand how module connections and field mapping work.
How Make operations are counted
Every module in a Make scenario consumes one operation each time the scenario runs.
A 3-module scenario (trigger, Google Sheets, Gmail) uses 3 operations per run.
At 100 form submissions per month, that is 300 operations, well within the 1,000 free plan allowance.
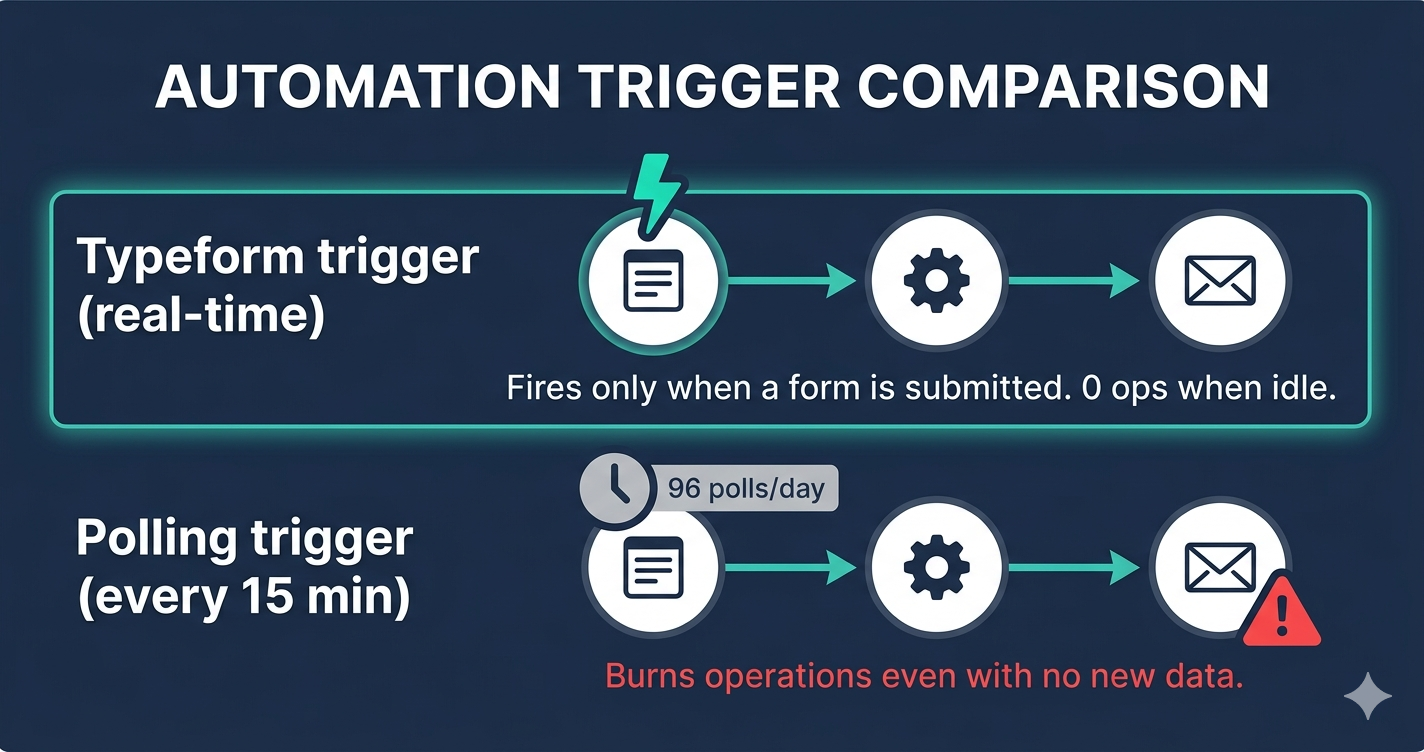
Polling triggers also consume one operation per check regardless of whether new data exists.
A polling trigger set to every 15 minutes fires 2,880 times per month, consuming 2,880 operations on polling alone even when no form is submitted.
This is why this guide uses Typeform as the trigger: Typeform triggers Make via a real-time connection when using the native Typeform module, consuming one operation only when a real submission arrives.
When to upgrade from free to Core
Upgrade when you need a third active scenario.
The free plan's 2-scenario limit is the constraint that hits first for most growing businesses, well before the 1,000 operation limit.
Upgrade when you need your automations to respond faster than 15 minutes.
Make Core gives you 1-minute polling intervals and the option to use webhook triggers for instant response on any scenario.
Make Core costs $10.59/mo billed annually and gives you 10,000 operations per month with unlimited active scenarios.
For most small businesses, Core covers all automation needs comfortably for the first 12 to 18 months.
What good looks like after this guide
You have one Make scenario running live, processing real form submissions and writing them to a Google Sheet without any manual input.
Your Gmail inbox shows a completion alert for each new submission with all fields correctly mapped.
Your Google Sheet has clean, consistently formatted rows with a timestamp on each record.
Your Make execution history shows every scenario run as green with no errors.
You understand what a module, a connection, and an operation are, and you are ready to add complexity to this scenario or build a new one.
What to build after your first scenario
After your first scenario runs correctly, the single most valuable thing you can do is build a second one that automates a different part of your business.
A practical second scenario: connect your Stripe or payment tool to a Google Sheet row so every cleared payment is logged automatically without you checking your dashboard.
A practical third scenario: when a new client signs up or pays, create a Google Drive folder for them and send a welcome email automatically.
Each new scenario takes less time to build than the previous one because you are reusing the connection authorisations and field mapping skills from earlier builds.
By the time you have built 5 scenarios, Make's visual builder will feel as natural as any other tool you use daily.
Common questions after the first build
If your scenario runs but the Google Sheet row has blank fields, the issue is almost always a column name mismatch: the column header in the Sheet does not exactly match what you typed in the Make mapping.
If your scenario shows green in execution history but no Gmail alert arrives, check that the Gmail module is connected to the correct Google account and that the To field is mapped to a valid email address, not a variable that resolves to empty.
If your scenario status shows Inactive after you toggled it On, you forgot to click Save.
Click Save in the top-right, verify the green Active badge appears on the Scenarios dashboard, and the scenario is live.
Understanding Make execution history
Every time your scenario runs, Make logs the execution in a history panel accessible from the scenario view.
Each log entry shows: the time the scenario ran, how many operations were consumed, whether each module succeeded or errored, and the exact data that flowed through each module.
The execution history is the most important tool for debugging a broken scenario.
When something goes wrong, open the most recent failed execution, click the red module bubble, and read the error message before changing anything.
Most errors are explained in plain language in the error message and can be resolved without any technical knowledge.
Implementation Steps
Create your free Make account and explore the interface
Set up your Make account, understand the three main sections of the interface, and orient yourself before touching a single module.
- • Go to make.com and click Get started free, then create an account with your email or Google login
- • When prompted to create an organisation, enter your business name and skip any paid plan offers by clicking Continue on free
- • On your Make dashboard, note the three main sections: Scenarios (where you build automations), Connections (where you authorise apps), and Templates (pre-built scenarios you can import)
- • Click Scenarios in the left sidebar and then Create a new scenario to open the scenario builder canvas
- • Look at the empty canvas: the large circle in the centre is where your first trigger module will go
- • Close the scenario without saving and return to the dashboard before building anything
Free. No credit card required. The Make free account has no expiry date.
The Catch
Make shows a guided setup wizard on first login that pushes you toward templates. Templates look appealing but teach you nothing about building from scratch. Close the wizard and create a blank scenario for your first build so you understand every module you add.
Set up your Google Sheet with the correct column headers
Create the destination spreadsheet before building the Make scenario so you can map columns directly during the build without stopping mid-way.
- • Open Google Sheets and create a new spreadsheet named Make Test - Form Submissions
- • In Row 1, type the following column headers in separate cells: Timestamp, Name, Email, Phone, Message
- • These headers must match exactly what you will map from your form in Step 4
- • Leave the spreadsheet open in a browser tab so you can reference the column names while building the scenario
- • Do not add any data rows yet, the scenario will write the first real row when you test it in Step 6
- • Copy the spreadsheet URL from your browser address bar and paste it into a note for reference
Google Sheets is free. No Google Workspace paid plan is required for this scenario.
The Catch
Make maps Google Sheets columns by their exact header text. If you name a column Name in the Sheet but your form calls the field Full Name, the mapping step in Make will show a mismatch. Set your column headers to match your form field names exactly before building the scenario.
Create a simple Typeform or Tally form as the trigger source
Build the intake form that will trigger your Make scenario, with fields that match your Google Sheet column headers.
- • Go to typeform.com or tally.so and create a free account
- • Create a new form with the following fields: Name (short text), Email (email field), Phone (phone or short text), Message (long text)
- • Publish the form and copy the published form URL
- • Submit one test response using your own details so the form has at least one submission in its history
- • Keep the form tab open, you will need to access it when connecting Make in Step 4
- • If using Tally: Tally triggers Make via webhook and fires in real time. If using Typeform: Typeform triggers Make via its native app and also fires in real time on the free plan.
Typeform Free and Tally Free both work for this scenario. No paid form plan is required.
The Catch
Google Forms is a tempting zero-setup alternative but it uses polling to trigger Make, not a real-time webhook. On the Make free plan, polling runs every 15 minutes, meaning a form submission waits up to 15 minutes before triggering the scenario. Use Typeform or Tally for a responsive first scenario.
Build the scenario: trigger module and Google Sheets action
Connect Typeform to Make as the trigger and add a Google Sheets module to write each new submission to your spreadsheet.
- • Open Make, create a new scenario, and click the empty trigger circle
- • Search for Typeform (or Tally) and select Watch New Responses (Typeform) or Watch New Submissions (Tally)
- • Click Add, name the connection Typeform or Tally, and authorise your form account
- • Select the specific form you created in Step 3 and click OK
- • Click the + icon to the right of the Typeform module and search for Google Sheets, then select Add a Row
- • Connect your Google account, select your spreadsheet and the correct sheet tab, and map each column header to the matching Typeform field
All modules used here are available on the Make free plan. Google Sheets is free.
The Catch
When mapping Typeform fields to Google Sheets columns, Make shows the Typeform field IDs (long alphanumeric strings) in the dropdown, not the human-readable field names. Hover over each field ID to see the label, or submit a test response first so Make displays the actual values alongside the IDs. Without a test response, the mapping dropdown is nearly unusable.
Add a Gmail alert module as the final step
Add a Gmail Send an email module at the end of the scenario so you receive a notification every time a new form submission is processed.
- • Click the + icon after the Google Sheets module and search for Gmail
- • Select Send an email and connect your Google account
- • Set the To field to your own email address
- • Set the Subject to: New form submission from {{name}} and map the name field from the Typeform trigger
- • Set the Content to: Name: {{name}} | Email: {{email}} | Phone: {{phone}} | Message: {{message}} and map each field
- • Click OK and save the scenario with a clear name: Form to Sheets plus Alert
Gmail is free. The Gmail module is available on all Make plans including free.
The Catch
If you connect Make to Gmail using the same Google account that owns the destination Google Sheet, you may encounter an OAuth scope conflict where Make asks you to reconnect Google twice. To avoid this, authorise Google Sheets and Gmail as two separate Make connections under two separate connection names, even if both use the same Google account.
Ready to get started with Make?
Visual automation canvas that handles complex workflows Zapier simply cannot.
Try Make Free →Test the scenario with a real form submission
Submit a real entry through your live form and confirm every module in the scenario fires correctly before turning it on.
- • Open your published Typeform or Tally form on your phone or in a new browser tab
- • Submit a complete test entry with your own name, email, phone, and a test message
- • Return to Make and click Run once in the scenario builder to trigger a manual check
- • Watch the module execution bubbles animate: each module should show a green circle with a number indicating it processed one record
- • Open your Google Sheet and confirm the new row appeared with all fields correctly mapped
- • Check your Gmail inbox and confirm the alert arrived with the correct data
Test runs on Make do not count toward your monthly operation allowance.
The Catch
If a module shows a red error bubble instead of green, click it to read the error message. The most common first-build errors are: Google Sheets column name mismatch (the column header in the scenario does not match the sheet exactly), Gmail OAuth scope error (reconnect Google as described in Step 5), and Typeform returning no new responses (submit a new real entry after clicking Run once, not before).
Set the scheduling interval and activate the scenario
Configure how often Make checks for new form submissions and switch the scenario from Off to On for live operation.
- • Click the clock icon in the bottom-left of the scenario builder
- • Set the scheduling interval to Every 15 minutes (the minimum on the free plan) or Every 1 minute if you have upgraded to Make Core
- • Click OK and then click Save in the top-right corner
- • Toggle the scenario status switch at the bottom of the builder from Off to On
- • Submit one more real test entry through your form and wait for the polling interval to pass
- • Confirm the new row appears in your Google Sheet and the Gmail alert arrives without manually triggering Run once
Make Free supports scheduling at 15-minute intervals. Make Core at $10.59/mo billed annually reduces the minimum interval to 1 minute. If you need instant responses to form submissions, switch the trigger to a Typeform webhook instead of the polling trigger for real-time execution on any plan.
The Catch
The scenario toggle switch at the bottom of the builder and the Save button are two separate actions. Toggling to On without clicking Save does not activate the scenario. Always click Save after toggling to On. You will know the scenario is saved and active when the status indicator on the Scenarios dashboard shows a green Active badge.
Tools That Can Run This
This guide uses Make. Here is how alternatives compare.
| Tool | Plan Needed | Monthly Cost | Best For | The Catch |
|---|---|---|---|---|
| Make | Free | $0 | Testing your first automation and running 1 to 2 low-volume scenarios permanently at no cost | Limited to 2 active scenarios and 15-minute polling intervals. For a third scenario or faster trigger intervals, upgrade to Core at $10.59/mo billed annually. |
| Zapier | Free | $0 | Faster first-build experience with a more guided step-by-step interface for absolute beginners | Zapier Free allows only 100 tasks per month and single-step Zaps. A trigger-plus-two-actions workflow requires a paid plan. Make Free is more generous for multi-step testing. |
| n8n | Self-hosted (free) | $0 | Unlimited operations at zero cost for users comfortable with server setup | Requires Docker and a VPS to self-host. Not a practical first automation tool for non-technical users. Start with Make and migrate to n8n if you outgrow it. |
Implementation notes for global businesses
🌍 Africa
Make Free requires no credit card and works across Africa with any internet connection. Google Sheets and Gmail work without restriction. Typeform Free is accessible globally but requires a Typeform account, which can be created with any email address. If Typeform loads slowly in your region, use Google Forms as the trigger instead. Google Forms does not trigger Make in real time (it uses polling), but both the trigger and the Google Sheets action are in the same Google ecosystem, which reduces connection complexity for a first scenario.
🌍 Latin America
Make Free works without restriction across Latin America. All tools used in this guide (Make, Google Sheets, Gmail, Typeform) are available and load reliably across the region. Make Core billing for the upgrade step in Step 7 requires a Visa or Mastercard. Wise and Payoneer virtual cards work if your primary card is local.
🌍 Southeast Asia
Make Free and all tools in this guide work without restriction across Southeast Asia. Typeform and Google Forms both load reliably across the region. If you prefer a form tool with stronger regional presence, Tally (free, no account required for form creation) is an excellent alternative trigger for Make and triggers scenarios in real time via webhook, which gives you the instant response that Google Forms polling does not.
Common Mistakes
Closing the scenario builder without clicking Save
Make does not auto-save. Every time you make a change to a scenario, click Save in the top-right corner before navigating away. The scenario status dashboard will show Inactive for any scenario that has been toggled On but not saved.
Testing with Make's Run once button before submitting a new real form entry
Run once fetches the most recent unprocessed submission from Typeform. If you click Run once before submitting a new test entry, Make fetches your earlier test submission from Step 3 and shows it as the result, making it look like everything works even when it does not. Submit a fresh form entry first, then click Run once.
Using the same Google connection for both Google Sheets and Gmail
Create two separate Make connections for Google: one named Google Sheets and one named Gmail, even if both use the same Google account. Using a single shared Google connection often causes OAuth scope conflicts that silently break one module while the other continues to work.
Building on the Make free plan and then hitting the 2-scenario limit before going live
The Make free plan allows 2 active scenarios total. If you are testing multiple scenarios simultaneously, you will hit the limit and Make will pause the oldest scenario. Either build and test one scenario at a time, or upgrade to Make Core at $10.59/mo before building more than 2.
Ready to go beyond 2 active scenarios?
The Business Automation Starter Checklist is the planning document to complete before building your second and third Make scenario so you do not build the same logic twice.